Note: This is a revised version of the post , ET Smileys Panel over your comment form updated for the new Blogger interface and Threaded Comments
Okay here's a little more to add to your very own et Smileys Script, which has helped a bunch of people to use adorable smileys on their blogs!
If you've enabled ET smileys in your blog, they can be used in the posts and even work in the comments. A little inconvenience here is that, even though all your visitors can use the smileys in their comments, they need not always know the correct smiley symbol to type in.

Here's the simple solution - just add a smiley reference panel over your comment form. Your visitors now have a handy guide to et Smileys!
The essential Steps
#0 Make sure that your comment-form is embedded below post. If you are sure about that, skip to Step #1.
Or else go to your Blogger dashboard. In the drop down menu next to the blog's name, Click on Settings and in Posts and Comments section, select Comment Location as Embedded

#1 Go to your Blogger dashboard, and in the drop down menu next to the blog, click Template and click on the Edit HTML button
#2 You need to edit 3 parts of code in the template.
a Now find the following piece of code in the template : (You can hit Ctrl+F and enter the code to search)
The below screenshot shows the entire code which you need to replace:
(click for larger image)
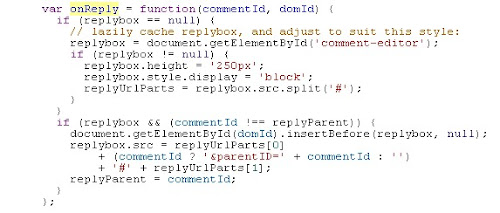
Select all the code starting from var to the last semicolon (;), and replace it with the below code:
Okay here's a little more to add to your very own et Smileys Script, which has helped a bunch of people to use adorable smileys on their blogs!
If you've enabled ET smileys in your blog, they can be used in the posts and even work in the comments. A little inconvenience here is that, even though all your visitors can use the smileys in their comments, they need not always know the correct smiley symbol to type in.
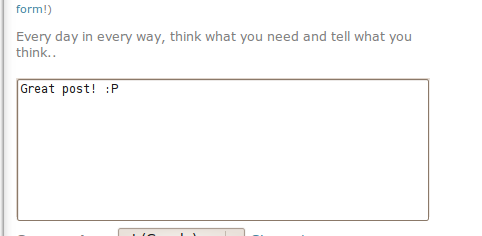
Here's the simple solution - just add a smiley reference panel over your comment form. Your visitors now have a handy guide to et Smileys!
The essential Steps
#0 Make sure that your comment-form is embedded below post. If you are sure about that, skip to Step #1.
Or else go to your Blogger dashboard. In the drop down menu next to the blog's name, Click on Settings and in Posts and Comments section, select Comment Location as Embedded
#1 Go to your Blogger dashboard, and in the drop down menu next to the blog, click Template and click on the Edit HTML button
#2 You need to edit 3 parts of code in the template.
a Now find the following piece of code in the template : (You can hit Ctrl+F and enter the code to search)
var onReply = function
The below screenshot shows the entire code which you need to replace:
(click for larger image)

Select all the code starting from var to the last semicolon (;), and replace it with the below code:
var onReply = function(commentId, domId) {
if (replybox == null) {
// lazily cache replybox, and adjust to suit this style:
replyboxContainer = document.getElementById('comment-editor-container');
replybox = document.getElementById('comment-editor');
if (replybox != null) {
replybox.height = '250px';
replybox.style.display = 'block';
replyUrlParts = replybox.src.split('#');
}
}
if (replybox && (commentId !== replyParent)) {
document.getElementById(domId).insertBefore(replyboxContainer, null);
replybox.src = replyUrlParts[0]
+ (commentId ? '&parentID=' + commentId : '')
+ '#' + replyUrlParts[1];
replyParent = commentId;
}
};
b Likewise replace one more piece of code in the template.
Again, find the following piece of code in the template : (You can hit Ctrl+F and enter the code to search)
<b:includable id='threaded-comment-form' var='post'>
Click on the small arrow to the left of this line to unfold the full code. A few lines below the above part, look for the following code (click for larger image):

Here you can see the iframe tag highlighted in green. Replace the highlighted part with the whole of below code:
<div id='comment-editor-container'>
<script src='https://et-smileys.googlecode.com/svn/trunk/etSmileysPanelFull.js' type='text/javascript'/>
<iframe allowtransparency='true' class='blogger-iframe-colorize blogger-comment-from-post' frameborder='0' height='500' id='comment-editor' name='comment-editor' src='' width='100%'/>
</div>
<script src='https://et-smileys.googlecode.com/svn/trunk/etSmileysPanelFull.js' type='text/javascript'/>
<iframe allowtransparency='true' class='blogger-iframe-colorize blogger-comment-from-post' frameborder='0' height='500' id='comment-editor' name='comment-editor' src='' width='100%'/>
</div>
The highlighted script tag in above code determines which of the two flavors of smiley panel is used. The above code uses the full smiley panel. You can replace the script tag part for a minimal smiley panel.
See Step #3 below for detailed options.
c Threaded comments will not be enabled until at least one comment is added to the post. In order to account for this case, you need to add the smiley script in one more place.
Search for the following code in the template:
<b:includable id='comments' var='post'>
If there is a small arrow to the left of this line, Click on it to unfold the full code. Below this line, look for the following code (click for larger image):

Below the closing <h4/> tag, paste the following code:
<b:if cond='data:post.numComments == 0'>
<script src='https://et-smileys.googlecode.com/svn/trunk/etSmileysPanelFull.js' type='text/javascript'/>
</b:if>
<script src='https://et-smileys.googlecode.com/svn/trunk/etSmileysPanelFull.js' type='text/javascript'/>
</b:if>
Again, see below for the two options of ET Smiley Panel that you can choose from!
#3 You have two choices of smiley panels:
a One, you can display the entire set of available smileys above your comment form. In order to make this happen, copy the below code and paste it after the line, as said in Step #2:
<script
type="text/javascript"
src="https://et-smileys.googlecode.com/svn/trunk/etSmileysPanelFull.js"></script>
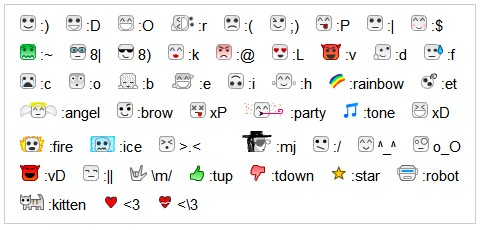
Note: More smileys may be added in the future, and this panel may get bigger then.
b Way two, you can add a minimalist panel of selected, most frequently used smileys. Copy the below code and paste it in the appropriate position:
<script
type="text/javascript"
src="https://et-smileys.googlecode.com/svn/trunk/etSmileysPanelBasic.js"></script>

Hope you find the smileys panel a most useful addition! :)


